Thursday, July 9, 2015

Nepali Momos

Steam Lifts, mist rises, blooming and aglow are these tender, succulent momos, wrapped in them are the smell and flavours of the oriental lands of the antiquity. Delightfully simple or simply delightful. 

Any of you who has taken a winter afternoon lazy stroll in the markets of Delhi is not unfamiliar to the steam billowing pots on the roadside with signs that typically read: 'Tibetan Momos' , 'Nepali Momos'. If there ever existed a 'Kingdom of healthy yet tasty foods', a momo would be its undisputed king for eternity. However, we always find it cumbersome to make these at home. Let me tell you one little secret which has been buried in the Himalayan kingdoms- making momos could be a wee bit easier than walking out and buying those. I will tell you how. So if you want to surprise someone with a cane box full of steaming momos as an afternoon snack, you are reading the right story

Last November I travelled to Kasol village in Himachal Pradesh my daily routine was a black tea and noodle soup at a tiny noodle shop run by family of three from Darjeeling. The shop served momos, noodle soup, eggs with buns and tea . Each morning I watched how the couple made fresh dough for momos and noodles, they deftly rolled the dough and passed it through a hand cranked noodle machine. The dough sheets were cut into rounds for momo wrappers. Fresh mixture of meat, minced veggies and minimum seasoning was tossed as a stuffing for momos and a large cauldron of stock was always simmering, a bowl of which would be served with a plate of steamed momos. They were generous enough to let me into  their kitchen and dabble a bit with momos.  The brief experience I had at Kasol gave me the courage to attempt momos at home and I surprised myself.

There are two parts to making momos: the wrapper and the stuffing. Here is the list of ingredients and the method to make momos


Fresh Steamed Momos with Broth
Mrs. Hyolmo tossing freshly blanched noodles


Trying to be of help to the Hyolmo family

The soulful noodle soup


Rolling out the Wrapper
Wrappers stacked
Stuffed and ready
Steamed Momo


For the wrapper:

Yields about 16 to 20 depending on the size of the cutter

Ingredients

Flour  - 250 grams
Salt - 1/2 tsp
Water -  1/2 c to 3/4 c
Baking powder a pinch
Corn flour for dusting

For the stuffing:

Ingredients

Chicken, minced 200 g
Fat 25 g
Spring onion 1
Ginger 1 inch 
Mirepoix of (Garlic 4 cloves, Onion 1 small, Celery 6'inch stalk(optional)
carrot 1 small) 
Cabbage 1 heaped cup
Parsley or Coriander 2 tbsp
Sesame oil 2 tsp
Pepper 1/2 tsp
Soy sauce 1 tsp
Salt to taste


Method

Wrapper

Boil water and set aside for a minute

To knead use the dough hook attachment of the stand mixer or use a spatula if kneading by hand. Mix the hot water into the flour

Knead for about 2 to 3 minutes till the dough comes together, add water by tablespoon if the dough is too dry

Continue kneading the dough till it is somewhat soft, yet firm.

Wrap in a cling film or cover with a damp cloth and set aside for a minimum of 15 minutes or upto 2 hours

To make the wrappers, dust the kitchen counter with corn flour and place the dough on the counter. Shape the dough into a log and cut into equal portions.

By using a rolling pin or a pasta maker roll the portions into rounds of 1/8" inch thickness or as thin as possible.

Using a round cutter, trim the excess dough for a even appearance

Stack the wrapper one above, avoid the wrappers sticking to each other by dusting cornstarch between each wrappers

Stuffing

Wash the chicken and set aside for the water to drain, add fat and mince chicken in a meat mincer or take it to your local butcher

Using a microwave steam the cabbage for a few minutes till tender alternatively the cabbage can be cooked in a open pan 

Finely dice all the ingredients for mirepoix

Heat oil in a small frying pan. To the oil add garlic, onion and other mirepoix ingredients and saute for a minute on low heat

Once the mirepoix mixture  is fragrant add ginger, cabbage, chopped parsley/coriander, spring onion and saute for a minute more

Add some fresh cracked pepper, season with salt to taste and set aside to cool

Add the cooled mixture to raw minced chicken and mix until the meat and flavoring is thoroughly combined

Putting it together – Momos

Place a teaspoon of stuffing in the middle of each wrapper

Dip your finger into water and run it on the skirting edges to seal

Fold the wrapper into crescent shape or any desired shape, ensuring there are no air bubble and the edges are tightly sealed

Place the dumplings upright on a floured pan, cover the pan with a damp kitchen towel or spray water on the prepared dumpling to avoid dry dumpling skin 

Place the prepare water for steaming and place the dumplings on a lined steamer

Steam for about 15 minutes 

Serve hot with Sriracha sauce


Monday, July 6, 2015

Oat Porridge with Nuts and Seeds

Goldilocks went on a trek through the forest she stumbled upon a house where mama bear, papa bear and baby bear lived. Mama bear had made hot porridge for her little bear family. Mama bear knew whats good for her family and so does your mama. Listen to your momma and get your first meal of the day right with four dollops of porridge. Start your day like you own it, like a BOSS! Make a bowl of porridge with oats, toss in some fruits, nuts, seeds or whatever the hell you have at home. The oats gives you some fibre, controls your blood sugar and no growling bear tummy till lunch.  


Here are the top healthiest nuts and seeds - Reference Source here

Almonds have as much calcium as milk, and contain magnesium, vitamin E, selenium and lots of fiber. They can lower cholesterol and help prevent cancer.
Walnuts are extremely good for your heart and brain, and contain ellagic acid a cancer-fighting antioxidant.
Cashews are rich in minerals like copper, magnesium, zinc, iron and biotin. They are actually a low-fat nut, and like olive oil, they have a high concentration of oleic acid, which is good for the ticker (your heart). According to Dr. Andrew Saul, one big handful of cashews provides one to two thousand milligrams of tryptophan, which will work as well as prescription antidepressant Prozac.  
Dates are natural sweeteners contain health benefiting flavonoid polyphenolic antioxidants known as tannins. Tannins are known to possess anti-infective, anti-inflammatory, and anti-hemorrhagic  properties
Flax seeds Two tbsp of ground flax seed per day is ideal and easy to add to oatmeal or smoothies. It is the best source of parent omega-3s (better than fish oil) and Lignans, super anti-oxidants that help fight cancer. It also contains a lot of fiber and can reduce your risk of heart disease, stroke, and diabetes
Sunflower seeds also help prevent heart disease and cancer with phytochemicals, folate, Vitamin E, selenium and copper.
Pumpkin Seeds are great for your immune system with lots of antioxidants (carotenoids), omega-3 fatty acids and zinc.
Sesame Seeds are a good source of calcium, magnesium, zinc, fiber, iron, B1 and phosphorus.  They can lower blood pressure, and protect against liver damage. Sesame seeds have also been linked to prevention of many diseases like arthritis, asthma, migraine headaches, menopause, osteoporosis, and may even reduce PMS symptoms.
Oat Porridge
Serves 2
Time 10 Mins
Oats 1 C
Water, preferably hot 3 C
Nuts, Seeds, dried berries  2 tbsp
Salt a pinch
Honey, Optional 2 tbsp
Fruits fresh, chopped 1/2 C
Method
In a saucepan toast the nuts, seeds till slightly brown and fragrant 
Add the oats, using a spatula toast the oats for 2 mins to 3 mins
Pour water into the toasted oats and add a pinch of salt
Stirring occasionally cook till the oats absorb most of the liquid 
Pour the porridge into the bowl and garnish with more nuts, honey, milk if you like
*oats can be cooked in bulk and stored in fridge. Use hot water or milk to loosen the oats and add roasted/soaked nuts and serve
** Soaking nuts/seeds is healthier than toasting or roasting nuts/seeds

Wednesday, July 1, 2015

Doughtnuts


Ever gone on a food binge? The fried and naughty kind? A binge that would win the popularity contest of food binges is "The Grand Doughnut Binge" the fried ring shaped dough over powers you like a true ring master, the fiercest of healthy diet lions cant stop at just one. 


Frying dough has been a part of traditional cooking all over the world. However this harmless looking fluffy cushion of taste bud grazing sweetness took the world by storm. If you go through the history of fried dough it comes in different shapes and sizes, sweet and savoury and then we have the doughnut to add colour to the catalogue. Fried dough filled with cream, custard, icing or jam with a coating of chocolate, sprinkles or spicy cinnamon sugar an instant pick me up. What blends inside like sugar and cinnamon is sprinkled on top and what usually goes on top or under is stuffed inside a topsy turvy world of sugar rush. 

Have it when its hot! Doughnuts are honestly best enjoyed when they are fresh out of the fryer. They do not go stale so easy, but the flavour and fun slightly diminishes over time and quickly so. If you want to grab every bit of goodness a piece of doughnut can give you, you may have to stand next to the fryer as the chef tosses doughnuts straight into your mouth. Extremely exciting as it sounds its not really possible to have access to the kitchens of fast food restaurants that sell doughnuts and the chefs will not take too kindly to such behaviour.  

Dough-NOT fret, here is a recipe that will get you flipping and tossing perfect doughnuts in no time. 

P.S. Here is an interesting article about the history of doughnuts

Doughnuts

Yield- 16 to 20  large

Flour 500 g

Sugar 30 g

Salt 10 g

Yeast 15 g

Evaporated milk 20 g

Milk 250 g to 350 g

Eggs 2 

Zest of an orange

Butter 60 g

Oil for Deep frying

Method

In a big wide mixing bowl weigh the dry ingredients, rub the zest of orange into the dry 
ingredients 

In another mixing bowl beat the milk, vanilla and eggs till homogenous

Create a well in the middle of the dry ingredients and pour the entire milk and egg mixture in the centre

Using a wooden spatula or your hand combine the ingredients to form a shaggy mass of dough

Use additional milk a tbsp at a time or an extra dusting of flour if required to make a soft ball of dough

Knead for 2 mins and empty the dough onto a clean kitchen counter

The dough at this point will be very sticky and tacky.

Continue kneading the dough for another 8 minutes to 10 minutes, giving a break for 2 minutes to 3 minutes in between kneading to allow the gluten to relax and absord the liquid

Knead the soft butter into the dough till the butter coats the dough well and the dough acquires a little shine

Shape the dough into a ball on the platform. 

Cover the dough with a damp kitchen cloth allow to proof for 1 hour or double in size

Degas the dough by tapping on the surface and place the dough on a well floured platform

Roll the dough into 1/4 inch thick circle or a rectangle and cut rounds using a doughnut cutter

In a deep pot heat oil to 190 deg celsius, on a low to medium flame fry the doughnuts for two minutes on each side

Toss the hot doughnuts in cinnamon sugar and EAT!

Tuesday, June 9, 2015

The wonderful world of sauces

Culinary artists across centuries and countries have given us some marvellous little treats that we have so loved to devour. For me personally nothing comes close to a perfect sauce. The way to my heart (if its got to be food) is through a bottle of sauce.  When I say sauce I'm not just talking about the sweet, tangy or spicy ones we like to dip our Chips in. Today on the top of the charts we have this curious little concoction they came up with around the early 18th century called the... *drumroll* Mayonnaise.
A jar of homemade Mayonnaise

Though its believed to be a product of kitchen experiments, the mayo makes the burger more palatable without messing much with the meat flavours, makes our salads more appetising by cutting through the bitterness of a few stray leaves and binds the healthy and guilty pleasures with so much ease and it tastes really good with chips - anything that gets along with chips is a champ!

Its incredible to see what the food corps have done with the mayo. So, as a child I believed that mayo was best made industrially, when one day my mother whipped up this great mayonnaise at home. I was stumped! I kept repeating with disbelief. "You can make mayonnaise at home", The homemade mayo had flavour and texture that out did the store bought bottled mayo.

The nutrition value of mayo may not be very impressive, however it can be had in small quantities. If we feel like dipping our faces in a bucket full of mayonnaise we have a problem and we must fight the urge to do so. We cannot do much about it other than pray to the tub of mayo to be kind on our wobbly pits, this simple recipe can bring you the joy of making a jar full of mayonnaise at home. I adapted the recipe from the book called Ratio by Michael Rhulman.  There is some smart science and good knowledge of emulsifiers involved in the making of the mayo that Rhulman explains about in the book

Blending yolk, water, lemon juice and salt
     
Mayo after 1/2 cup of oil
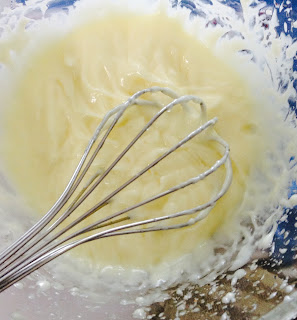
Creamy mayo clinging to the whisk 


Basic Mayonnaise

Time take : Whisk- 20 to 25 minutes
                   Immersion hand blender 1-2 minutes

Ingredients

Egg yolk 1
Salt 1/2 tsp
Lemon juice 1 1/2 tsp
Water 1 tsp
Sunflower Oil upto 1 cup ( 3/4th cup if using a immersion hand blender)

Method

In a large bowl add a yolk, salt, lemon juice and water.
Use a kitchen cloth to support the base of the bowl while whisking.
Using a whisk or immersion hand blender, beat/buzz the the mixture of yolk, water and lemon juice briefly to blend
Using a cup, pour the oil in a steady thin stream or few drops at a time and blend to form emulsion
The oil and yolk mixture begins to thickens after adding in 1/4th cup of oil 
Stop whisking once all the oil is incorporated and the mixture clings to the whisk/blade
Empty the Mayonnaise into a clean jar and store in the refrigerator

Notes- If there is not enough liquid for the oil to emulsify, the mayo will turn into a soup. To fix broken mayo you will need to start with a fresh bowl. Add a tsp of water into the mixing bowl and pour the broken mayo in a thin stream whisking continuously till the oil reemulsifies into creamy mayo. 

Trivia: Originating from the west a European concept, French precisely. The east couldn't escape the love of mayo. The Japanese loved the mayo so much they used it as a pizza topping with squid!

If you have gone mental with the joy of making mayo at home and happy to have pushed aside days of depending on a food corp to provide you with a mayo fix, try using your mayo as a base to make the following variations

Thousand island = basic mayo + tomato ketchup + tobasco sauce
Garlic Aioli= basic mayo + finely chopped garlic + Parsley chopped + pepper
Lime and Chili Mayo = basic mayo + Lime Zest + Lemon Juice + Paprika powder or Red Chilli Chopped
Mustard Mayo= basic mayo + grainy mustard + a tsp of honey
Herby Mayo= basic mayo + parsley + chives + small onion chopped+ taragon
Sandwich Spread= basic mayo + coriander pesto + pickled jalapeno chopped + grated green apple +  Pepper


Tuesday, April 28, 2015

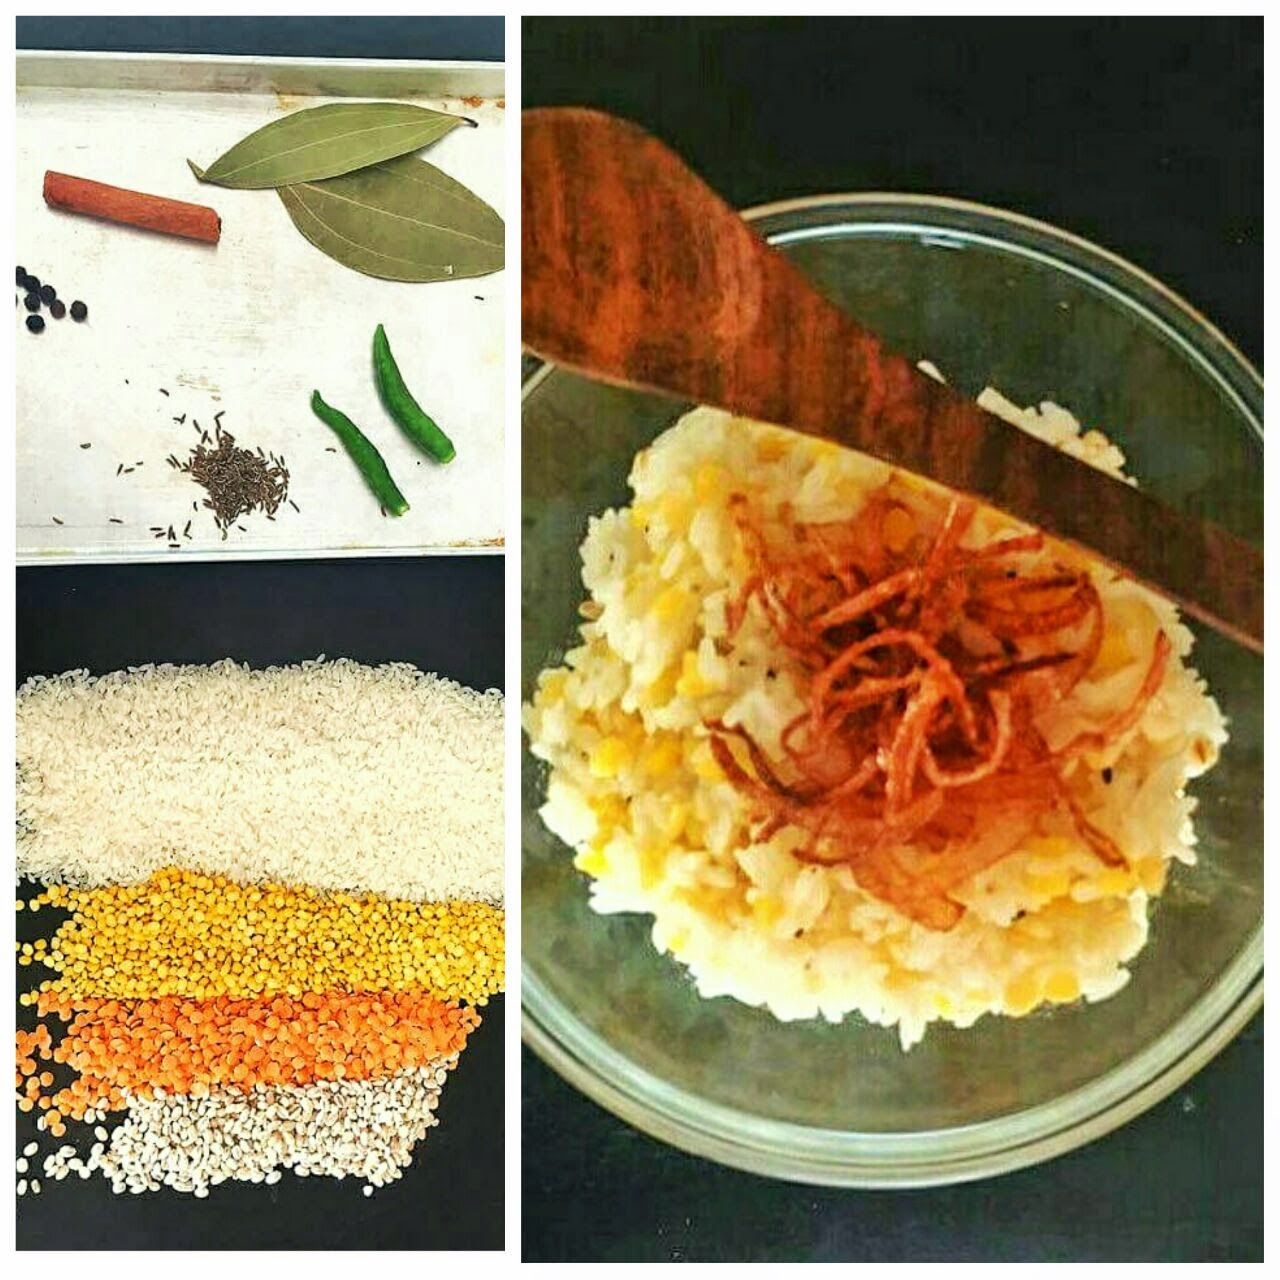
Rice, lentil (dal) and barley khichdi


vegeterian meal can be truly a detox and a satisfying experience after a whole weekend of partying. "Work hard - party harder - detox hardest" . In this recipe there are two reasons why I believe that this is the ultimate Monday recipe: simple to make and a delight for your taste budsKhichdi is essentially a combination of rice and lentils (dal). Numerous variants exist through the length and breadth of India. It finds its utility in temples, homes, restaurants and feasts. Easy to make, healthy and tasty, khichdi is a total cure for your hunger and for your indulgence. I bring to you the recipe for detox after the weekend: rice, lentil (dal) and barley khichdi.


Aroma that reaches the soul
And taste that exalts you whole

Ingredients
Oil 1 tbsp
Cumin, bay leaf, cinnamon, pepper
Chillies 2
Rock salt to taste
Rice 3/4th cup
Red gram 1/4th cup
Split green gram 1/4th cup
Barley 1/8th cup
Water 2 cups 
Deep fried onions for garnish

Method
Wash rice,lentils and barley
In a sauce pan, saute the spices and chillies in oil
Tip in the washed rice, lentils and barley, Saute for two mins
Add water and allow to cook for 20 mins.
Serve hot with deep fried onions

Aroma that reaches the soul
And taste that exalts you whole

Wednesday, April 1, 2015

Bread Baking class- II


What you will Make

Pizza From scratch- A winner dough recipe! An extra point as it tastes great even after you pre bake it and store it in the freezer, super handy when you throw a pizza party for a large group. we will also stir a pot of delicious tomato sauce to spread on the pizza. Add your personal touch when you top your pizza and call it your own.

5 grain Loaf- A simple loaf of bread made great by adding whole wheat flour, oats, flax seed, sesame, pumpkin and sunflower seeds. The sweet and nutty tasting loaf will be a guilt free substitute to your everyday white bread.

Rosemary and olive oil loaf- Eating a warm bread with a sprinkle of sea salt and splash of  olive oil is pure pleasure. we will gild the lily by adding fresh rosemary, some chopped walnuts and cranberries

Techniques you will learn

-An introduction to slow fermentation, role of yeast, hydration, proving and temperature.
-Knead- The right way of mixing the dough with (water) hydration level upto 65%
-Roll- Handling the dough and the good practices
-Shape-  loaf, boules, buns, batards.
-Basic tomato sauce- A recipe to make a mildly sweet tomato sauce, tempered with garlic and      bayleaf, flavoured with basil/oregano and cooking till the sugars in the juice are caramelised
-Marinate and Oven roast veggies and chicken
-Flavoured oils


Note- The mode of teaching is complete hands-on format. Each session can seat upto 5 participants. All the baking ingredients, material and recipe notes will be provided at the class.

Hope to see you and bake bread with you!

Wednesday, March 18, 2015

Doughnut Making Workshop


A one day workshop to get you to start making doughnuts from scratch. Come learn to mix, knead and shape the doughnuts. Experience the joy of transforming a yeasty sweet dough into pillowy light mouthfuls

The doughnuts will be made at home in a domestic kitchen so the same can be achieved at your home kitchens. All the ingredients and recipe notes will be provided at the venue. 

For registrations contact#8451852700


Monday, February 2, 2015

Sponge Cake

I do not know anybody who does not enjoy a slice of warm plain pound cake. The sweet aroma of the  cake baking in the oven takes me back to my childhood when baking at home was done only during summer holidays. My late grandfather was a teacher, he dabbled a bit in drama, cooking and baking. He had collection of typed recipes, essentially recipes from magazines snipped and pasted in a used school register, where he would meticulously write down all the pointers after testing a recipe in his handsome handwriting. I baked my very first cake under his supervision. We made a very basic pound cake, I do not remember how it tasted but I do remember he iced the cake for me and wrote a 'my first cake' on it with thinned fruit jam. Now after baking practically a thousand of cakes I can tell you it was not the best cake I baked but it still holds a special place in my heart.  A few years and a lots of cakes later my search for a light textured vanilla cake continued.


When I was rummaging through cookbooks looking for a light vanilla cake recipe I came across many and I mean MANY pointers on plain cakes. Tips to attain perfect crumb, texture, the tasty matrimony of butter batter and leavened flour. Promises of wonders if an extra yolk is added, lightness if I substitute some flour with corn starch, and quite a few different techniques. I incorporated as many as I could and now I have attained not somebody else's perfect pound cake but using the same ingredients I achieved a cake that satisfied my taste preferences. This cake is baked on many a Sunday morning breakfasts, for holiday brunches or anytime I crave a simple vanilla cake.

Going by technique and texture the cake is called a  'sponge cake'. It begins with beating sugar, flavouring(vanilla, lemon juice) and eggs for 5 full minutes till a ribbon like consistency is achieved i.e when you lift the beaters above the mixing bowl the batter runs down leaving a trail on the batter and disappears into the batter in a few seconds. After the right consistency is achieved the flour is then added with a gentle hand and mixed into the batter. While mixing continue scraping the bottom and sides of the mixing bowl till there are no traces of flour left. Add melted butter by gently folding the mixture over itself, taking care not to over work the batter. Bake in a preheated oven and treat yourself with a light as air, fluffy vanilla cake. An extra point is earned as no baking powder is called for in the recipe, thousands of air bubbles created by foaming eggs and sugar will help create the 'fluff' or leavened structure. The butter can also be significantly reduced to almost zero which will still yield you a cake called a (Genoise) cake but all the richness and flavour from butter will be deeply missed. However a Genoise cake is perfect if you are serving the cake after icing or splashing some soaking sugar syrup


Sponge cake
Adapted from Ratios by Michael Ruhlman

2 eggs
120 grams granulated sugar
A big pinch of salt (omit if using salted butter)
1 tablespoon lemon juice (optional)
1/2 teaspoon vanilla extract or a few drops of essence
120 grams all purpose flour (maida)
120 grams butter, melted and cooled

  • Preheat oven to 180 degrees C or 375 degrees F
  • Line a 6 inch cake pan with parchment paper or brush the pan with butter and dust some flour over the butter tap out the excess flour
  • Put the butter in a small steel bowl, place it on heat (stove top) till half of the butter melts. Remove from stove top and allow the resident heat of the bowl to melt the remaining butter
  • Sift the flour over a paper and leave aside to be used later. alternately a whisk can also be used to aerate the flour running it a few times through the flour 
  • In a large bowl preferably stainless steel, break the eggs into it. whip the eggs till a little foamy about half a minute using handheld electric beater or a stand mixer 
  • Tip in sugar, lemon juice, vanilla extract/essence, beat on low speed for about a few seconds and then proceed to increase the speed from medium low to high.
  • Stop in between to scrape the mixing bowl to make sure there is no sugar settled at the bottom of the bowl
  • Beat the mixture for a full 5 minutes or more. The batter must more than double in volume , the batter will drop like a ribbon and disappears into the batter
  • Mix the flour into the egg and sugar batter gently using a spatula/wooden spoon or electric beaters/stand mixer at lowest setting possible till no flour streaks are visible
  • Add the melted butter at once,  stir it into the batter using a spatula or wooden spoon, this must be done with a gentle hand to avoid breaking the bubbles that were created during the foaming process. 
  • Pour the batter into the prepared pan
  • Bake till done for about 25 to 30 mins or when a toothpick/knife inserted in the middle of the cake comes out without any wet lumps of batter.